Posts

Lydia Scarf

Image
                                          LYDIA SCARF This is a very beginner friendly pattern, that looks difficult to accomplish.  Supplies: 5MM Crochet hook Scissors worsted weight yarn in the following colors: RED, ORANGE, YELLOW, GREEN, BLUE, PURPLE, PINK, WHITE AND BLACK Tapestry needle STITCH GUIDE: ST: stitch CH: chain SL: slip ST HDC: half double crochet DC: double crochet *-*: Repeat from first asterisk to the next. PATTERN: Start by chaining 195, adding one more ST and turning. ROW1: HDC in each ST across CH 1 turn ROW2: with black, DC in the first 3 ST *change to white, DC in next 3 ST, change to black DC in next 3 ST* CH 1 turn ROW3-4: repeat row 2  ROW 5-12: DC in each ST across, CH 2 turn, changing colors at the end of each row ROW 13-15: with black, DC in the first 3 ST *change to white, DC in next 3 ST, change to black DC in next 3 ST* CH 1 turn ROW 16: HDC...
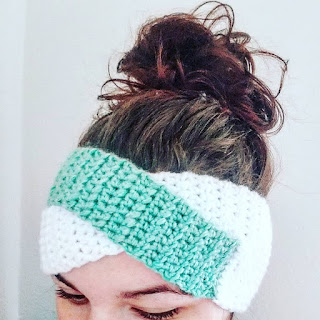
LARA EAR WARMER HEADBAND

Image
MATERIALS: 5MM crochet hook Worsted weight yarn Tapestry needle MC: CH 17 Row1: SC in 2nd CH from hook and each chain across, turn ROW 2-25: CH1 HDC across, turn Now you are going to split your row in half I'm going to start the row count over to help with confusion later on. TWIST: ROW 1-26: CH1 HDC for 8 STS, turn ROW 27: CH1 HDC for 8 STS, fasten off Join CC to the previous ROW 25 You are going to repeat TWIST rows 1-27 Lay your CC split over your MC split Join MC to split ROW 1:CH1 HDC across both splits, to join, turn ROW 2-19: CH1 HDC across ROW 20: CH1 SC across Fasten off leaving a long tail for sewing. Seam up the SC rows Weave in your ends, and you are finished!!

Milo hat

Image
I'm trying something new here. This pattern will be in a PDF, file. For easy download and print. I knew I love a good printed out pattern, that I can mark my notes all over! Lately I have been all about hats, that's what my cold seasons are all about! To download the pattern please click the link below. If you found me from Ravelry please add your finish product to the project page! PATTERN TIME! Milo Hat

NALA BEANIE

Image
MATERIALS: Worsted weight yarn (I used Red Heart retro stripes ) 5MM Crochet hook tapestry needle SPECIAL STITCHES: PS: puff stitch - Yarn over, insert hook into stitch, pull up a loop, yarn over insert hook into same stitch pull up a loop yarn over insert hook into same stitch pull up a loop, yarn over pull through all stitches on hook. This next part is going to be worked into rows to create the ribbing at the bottom of the hat. CHAIN 9  ROW 1: SC in 2nd CH from hook and in each ST across ROW 2: SC in BACK LOOP ONLY (BLO) across REPEAT ROW 2, 70 more times, or until desired length is met. Holding WS together SL along the 8STS to join into a round. WORKING IN THE ROUND RND 1: CH 1, SC in each SC around ending on an even number, join with a SL RND 2: CH 2, DC in each ST around, join with a SL RND 3: CH 2, DC into the back of the BAR under the ST (see photo) around, joint with a SL RND 4: CH2, DC in each ST around, joi...

SLAY

Image
This pattern is for those who can not read a graph (graph coming soon)! MATERIALS: 5mm Crochet hook 5.5mm Crochet hook Bulky yarn (I used LionBrand hometown USA) Scissors Tapestry needle STITCH INDEX: SL - slip stitch: insert hook yarn over, pull through, pull through loop without yarning over again. SC - single crochet: insert hook yarn over pull up a loop, yarn over pull through loop. KS - knit stitch: insert hook into stitch yarning over with color A, pulling up a loop, yarn over with color B pull through loop. TIPS: Carrying your yarn throughout the project will minimize the amout of ends you need to weave in. I on the other hand only carry my yarn through one round at a time and only for the letters. that leaves me about 14 ends to sew in. It's all subject to personal preference. With white: 5MM hook. SC in back loop only until the ribbing is complete CH 8 ROW1-62: SC (blpo) SL across to connect the 2 ends Now you will be working in the r...

Vanilla Mitten Recipe

Image
This is just a recipe, meaning it's a step by step, and you fill in the measurements. As my hand is not the same as yours because apparently, I was blessed with toddler sized hands. Okay, they're a little bit bigger than that. I will write the recipe for my hand size. Materials: Bulky weight yarn ( I used Loops and Threads Charisma) 5mm Crochet hook 5.5mm Crochet hook Scissors Yarn needle WITH COLOR A 5mm hook Start by chaining 11 (In back loop only) SC in 2nd Ch from hook, repeat across 2-26: (In back loop only) SC across  Fold edges together and slip stitch across to create the seam. SC around the now, top  when you reach your seam change to color B do not slip to join Add a Marker WITH COLOR B 5.5mm hook RND2-7 : SC around Now you are creating the thumb hole.  RND8: SC in next 3 ST,  at this point, pinch your work together, go through the front and back stitch with 1 SC , SC around RND9-15 SC ...

Scrump inspired VooDoo Doll

Image
Materials Scissors  Yarn needle 5mm Crochet Hook buttons stuffing Yarn colors "Mint green" Yellow black, or brown pink NOTES: I would suggest working on the limbs, and "collar" first, as you'll be sewing them on before you close the body up. MC - Magic Circle (if you haven't mastered the magic circle, an alternative would be to chain 3 join together and crochet inside the circle) SC - Single Crochet SC2TO - Single Crochet Two Together ** - Repeat everything between astriks. If you are unsure of any of the stitches above, there are some great tutorials on Youtube that will walk you through how to do them. Make sure to move your stitch markers at the end of each round, there will be many reminders as it's pretty important you do so. LIMBS: Starting with a MC RND1: SC 6 in MC RND2: 2 SC in each ST around RND3: *SC in next ST, 2 SC in next* RND4-15: SC in each ST around Add your stuffing, and sew your limb together so the to...

Lou-Lou Brimmed Hat

Image
MATERIALS: 6MM crochet hook Scissors Tapestry needle Worsted weight yarn, I used “I LOVE THIS YARN” RIBBED BRIM: Start by CH 6 (if you want the brim longer, CH more ROW1:SC in back loops only starting with 2 nd CH from hook [5SC] ROW2 ON: CH 1 SC in back loops across   (continue this pattern until circumference of head it met, remembering that it will stretch over time) Mine ended up being 60 rows, for an adult female. [5SC] Fasten off leaving a tail for sewing Sew the short ends together BODY OF HAT: Attach yarn, to any location on the brim and CH2 (I attached right at the sew) RND1: DC around, (as close together as you can, ending with an odd number) join with a SL RND2: CH1 SC in same ST as join and each ST around, join with a SL Rnd3: CH1 skip first ST, HDC in next ST, now HDC in Skipped ST ; skip ST after first HDC, and HDC in next ST, HDC in skipped ST repeat around ending with a single HDC in last ST join w...

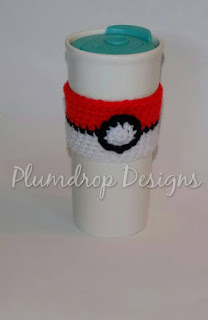
Pokeball Travel Mug Cozy

Image
Materials: Worsted weight yarn (red,black,white)  5mm crochet hook Tapestry needle  Scissors Gauge is not important in this pattern. Cozy: CH 28  Join with a SL to form a ring RND1-5: SC in each ST around join with a SL  with BLACK  RND6: CH1 SC in each ST around with RED RND7-11: CH1 SC in each ST around, join with a SL  (optional) SL around, to keep the top and bottom even. FASTEN OFF! Button: With WHITE Start with a MC 8 HDC in MC  with Black SC in each ST around Fasten off leaving long tail for sewing Line the button up with the center of the button on the black sc row, sew around. fasten off!

What have I been up to?

Image
  I have been working on a few new patterns, which I will be posting soon, I just have a few more revisions to make, I've been working on really improving them. I have also been working on being a mommy, and moving. It's been hard to find the time to put up new patterns. I have also been working on going back to school, I just feel like it's something I need to do, for myself.

POKÈBALL SET

Image
POK ÈBALL SET Materials: Red WW yarn Black WW yarn White WW yarn 5mm Crochet hook 4.25mm Crochet hook Darning needle Scissors Hat: Starting with RED Create a magic circle RND1: 10 DC in MC, join with a SL CH2 RND2: DC in same stitch as join, 2 DC in each stitch around, join with a SL, CH2 RND3: DC in same stitch as join [DC in next stitch, 2 DC in next] join with SL, CH2 RND4: DC in same stitch as join [DC in next 2 stitches, 2 DC in next] join with SL, CH2 RND5: DC in same stitch as join [DC in next 3 stitches, 2 DC in next] join with SL, CH2 RND6: DC in same stitch as join [DC in next 4 stitches, 2 DC in next] join with SL, CH2 RND7: DC in same stitch as join, 1 DC in each stitch around join with SL, CH2 CHANGE TO BLACK RND8: DC in same stitch as join, 1 DC in each stitch around, join with SL, CH2 CHANGE TO WHITE RND9-13: DC in same stitch as join,   1DC in each stitch around, join with SL, CH1 RND14-15: SC ...

Beginner Coasters

Image
This is a perfect beginner pattern for someone just beginning with a magic circle or just beginning to work in the round! It was inspired by constantly having to clean out the bottom of my cup holders in my car, due to soda spilling, or some drink "sweating" and crumbs and dirt gets stuck in there! MATERIALS: 5MM Crochet Hook Any brand of cotton yarn I used 2 colors Just because I wanted a little "spunk", one color or more is awesome as well! Start with a MC HDC 10 into MC join with SL  CH 2; 1 HDC in same ST, 2 HDC in every ST around join with SL CH2; 1 HDC in same ST, *1 HDC in next ST, 2 HDC in next*, repeat from* to *around, Join with SL FASTEN OFF! 

C2C Dishcloth!

Image
Start by Chaining 6 DC in 4th CH from the hook and in remaining 2 CH TURN CH 6 DC in 4th CH and in remaining 2 CH TURN the bottom "block" SL into "CH 3" space (the 3 skipped CH) CH 3, 3 DC in CH3 space at this point it should look like a V TURN CH 6 DC in 4th CH and in remaining 2 CH SL in first CH 3 space, CH 3, 3 DC in same space, continue all the way across continue this pattern until you have 10 blocks across TURN CH1, SL in the first 3 STITCHES, and in the CH 3 space, 3 DC in same space, continue as normal until the last "block". In the last "block" SL in the CH 3 space. TURN CH1, SL in the first 3 STITCHES, and in the CH 3 space, 3 DC in same space, continue as normal until the last "block". In the last "block" SL in the CH 3 space. continue this pattern until you have one block remaining. FASTEN OFF!  enjoy your new dishcloth

NFL HAT!

Image
                                                        With super bowl season upon us, I decided to make up a VERY SIMPLE hat pattern for an adult male, but truly can be sized for any head! I love changing the color of my yarn in patterns,I could not tell you why, I use to think it was a hassle and all of the sudden! BAM!  Alright enough chatter on to the pattern! Materials 5.5MM crochet hook 2 colors of your choice yarn! DC= double crochet SC= single crochet SL= slip stitch MC= Magic circle, Magic ring (etc) **= repeat COLOR A DC 12 into MC RND1: 2 DC in each ST around Join with SL   COLOR B RND2: 1 DC in first ST 2 DC in next, *1 DC in next ST 2 DC in next ST*  Join with SL COLOR A RND3: 1 DC in first ST, 1 DC in next ST 2 DC In next *1DC in next 2 STS, 2 DC in next ST* Join with SL RND4: 1 DC in firs...

Ninja Turtle Hat

Image
Are you ready for my first pattern? This hat is sized for a small child (fits my 3 year old!) Materials Needed worsted weight yarn 1 skein each (green and any color ninja turtle you're making) Enough white, for the eyes and braids 5.5mm hook Tapestry needle for sewing Base With color A Start with a magic ring and ch 2. RND 1: 12 DC in magic ring RND 2: CH 2 DC in same ST as CH2 and 2 DC in each ST around SL to beginning RND 3: CH 2 DC in same ST as CH2, *DC in next ST,2 DC in next ST, DC in next ST* SL to beginning RND 4: CH 2 DC in same ST as CH2, *DC in next 2 ST, 2DC in next ST, DC in next 2ST* SL to beginning RND 5: CH 2 DC in same ST as CH2, *DC in next 3 ST, 2DC in next ST, DC in next 3ST* SL to beginning RND 6-7: CH 2, DC in each ST around SL to beginning RND 8 : CH 2, DC in each ST around SL with color B RND 9-11: CH 2, DC in each ST around SL to beginning RND 12: CH2,DC in each ST around SL with color A RND 13 CH2, DC in each ST around SL to be...